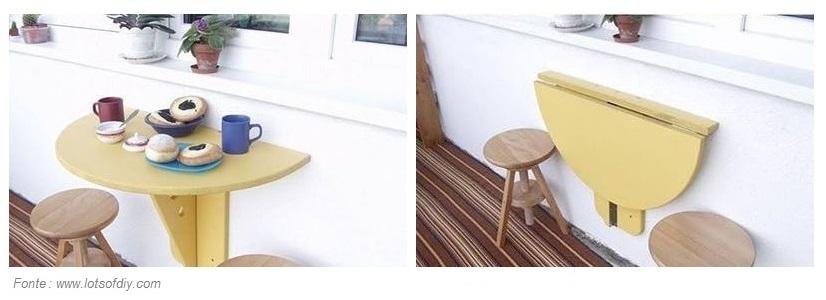
Procedure step by step to build a comfortable table by the wall space saver perfect for your balcony or your kitchen. Can be used as additional work in the kitchen.

Materials needed:
- 1 wooden board from 100x70x2 cm
- 2 planks of wood from 50x25x2 cm
- 1 zipper flat fixed pivot 50 cm
- 2 hinges floor bolt fixed small
- Many screws, how many are in the holes of the hinges + 4
Tools:
- Jigsaw (board: jigsaw Skil 4381AD - see)
- Sander for wood (board: orbital sander Skil 7380AA - see)
- Drill driver (tip: drill driver Boshc GSR 10.8 - see)
- Paint color that you want, and brush (see our equipment for paint)
Preparation:

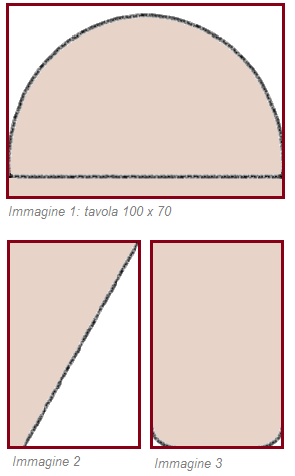
![]() Draw a semicircle on the table of larger wood, taking care to draw the horizontal line of the semicircle at a distance of 5cm from the edge (see image 1).
Draw a semicircle on the table of larger wood, taking care to draw the horizontal line of the semicircle at a distance of 5cm from the edge (see image 1).
![]() With the jigsaw cut the board along the traced lines, separating the semi-circle from the initial rectangle of the size of 5x100 cm. Smooth the edges of the semicircle obtained but not those of the rettangolor.
With the jigsaw cut the board along the traced lines, separating the semi-circle from the initial rectangle of the size of 5x100 cm. Smooth the edges of the semicircle obtained but not those of the rettangolor.
![]() On one of the two small to make a cut (with the hacksaw), starting from the tip in the top right corner up to the opposite end, leaving about one centimetre away from the tip (image 2). Smooth the edges. On this table to make any of the circles decorative by using a drill with a drill on the cup.
On one of the two small to make a cut (with the hacksaw), starting from the tip in the top right corner up to the opposite end, leaving about one centimetre away from the tip (image 2). Smooth the edges. On this table to make any of the circles decorative by using a drill with a drill on the cup.
![]() Always using the jigsaw to round the tips of the lower end of the last board of wood and smooth the edges (image 3). This axis will serve to attach the structure to the wall.
Always using the jigsaw to round the tips of the lower end of the last board of wood and smooth the edges (image 3). This axis will serve to attach the structure to the wall.
![]() Paint in the color you want all three tables, the rectangle obtained from the first operation, and leave to dry.
Paint in the color you want all three tables, the rectangle obtained from the first operation, and leave to dry.
Assembly:
![]() Lay the long zipper at the center of the axis of a rectangle of wood, in the direction of the length, and with the drill avvitarne a half-axis.
Lay the long zipper at the center of the axis of a rectangle of wood, in the direction of the length, and with the drill avvitarne a half-axis.
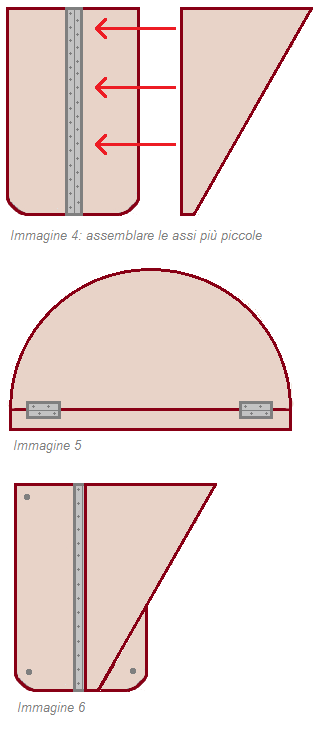
![]() Attach the table cropped triangolarmente to the other side of the zipper as shown in the picture 4. The half of the hinge in this case it must be positioned in such a way as to form an angle of 90 degrees with respect to the other half, so as to make the axis of the triangular rotatable 90 degrees. This axis will serve as a support for the table top.
Attach the table cropped triangolarmente to the other side of the zipper as shown in the picture 4. The half of the hinge in this case it must be positioned in such a way as to form an angle of 90 degrees with respect to the other half, so as to make the axis of the triangular rotatable 90 degrees. This axis will serve as a support for the table top.
![]() Take the rectangle of wood (5x100) obtained from the crop of the first table and re-anchor it to the semi-circle using the two hinges small, placing it exactly where it was before it was clipped (figure 5).
Take the rectangle of wood (5x100) obtained from the crop of the first table and re-anchor it to the semi-circle using the two hinges small, placing it exactly where it was before it was clipped (figure 5).
![]() Attach the table-rectangular (that is now joined to the triangular) to the wall by applying four screws at its four ends, keeping the rounded ends to the bottom (image 6).
Attach the table-rectangular (that is now joined to the triangular) to the wall by applying four screws at its four ends, keeping the rounded ends to the bottom (image 6).
![]() Open the door created with the zipper so that it is perpendicular to the axis rectangular to which it is attached, and rest on the top of the table, taking care to make it adhere well to the wall. Fix the parts using two screws in the rectangle attached to a semi-circle in a manner that is welded to the thickness of the plank of wood anchored to the wall. In this way, when the door of the triangular will be re-closed, the semi-circle is used and the table will be closed while to open it, simply lift the front of the table and move the axis triangular so that it is perpendicular to the axis to which it is attached.
Open the door created with the zipper so that it is perpendicular to the axis rectangular to which it is attached, and rest on the top of the table, taking care to make it adhere well to the wall. Fix the parts using two screws in the rectangle attached to a semi-circle in a manner that is welded to the thickness of the plank of wood anchored to the wall. In this way, when the door of the triangular will be re-closed, the semi-circle is used and the table will be closed while to open it, simply lift the front of the table and move the axis triangular so that it is perpendicular to the axis to which it is attached.
The source of the project: www.lotsofdiy.com
Try to do it too! If you liked the article share it with your friends, if you have something to add or want to give us your opinion about it leave a comment below!


